
Newsletter of E.J. Peiker, Nature Photographer and www.EJPhoto.com
All contents ©2007 E.J. Peiker
Summer 2007
(Vol 5, Issue 3)
Welcome to the quarterly update from E.J. Peiker Nature Photography. In this quarterly email publication, I will keep you all posted on upcoming workshops including the DuckShop Series as well as sharing some photos and experiences with you. I will also give you brief impressions on any new equipment that I get the opportunity to use and any other general information in the world of digital nature photography. Please feel free to forward this along to other photographers and interested parties. If you would like to be added or deleted to the mailing list or if you would like copies of past issues, just send me an email message at ejpeiker@cox.net. Back issues (sans photographs) are available online at http://www.ejphoto.com/newsletter.htm.
EOS 1D Mark III – Why I haven’t Made the Switch!
On paper, the EOS 1D Mark 3 is a huge leap from its predecessor, the EOS 1D Mark IIn. While the pixel increase from 8.2 to 10.1 is miniscule, that’s not what this camera is about. This camera is a complete redesign of the inner workings of the EOS digital system and for the first time, rids itself of some of the arcane hangovers from the film days. Some of the new features include:
- 10.1 Megapixel Sensor
- 14 bit per pixel color increasing the number of discrete color values per pixel from 4096 to 16,384
- Integrated sensor cleaning system
- New Autofocus system with 19 high precision sensors that also autofocus in conditions that are a full stop darker than its predecessor
- Lithium ION battery which results in a significant weight reduction
- A higher durability shutter rated at 300,000 activations MTBF
- Dual DIGIC image processors – both are a new and faster DIGIC III generation
- 3 inch LCD
- Live View
- Highlight Tone Priority Mode which helps reduce blowing the highlights
- Elimination of customizable functions that require you to hook the camera to a computer
- Individual lens focus calibration capability
All of this stuff sounds great and yes I do want all or at least most of these features. So why haven’t I upgraded? This is a completely new camera with completely new inner workings using a new processor with completely new camera control logic, new autofocus system and many completely new features such as live view and integrated sensor cleaning. Being a nearly 25 year veteran of the electronics industry, I know that when you combine this many new technologies all at once, there is a very high probability of it all not working together the way it needs to initially. It is also unlikely that a testing program by the manufacturer will even come close to exploring all regimes that this camera might be used in. Even when it came to upgrading computers to a new technology, I waited until some of the technical and manufacturing bugs were worked out. I most certainly would want to wait on a new system as complex as an EOS Pro camera costing $4500.
As many of you know, my experience with brand new Canon products has not been good and I have had to return or repair a number of cameras and lenses that I bought from the first one or two production cycles. Those were evolutionary products with only minor systems changes. The EOS 1D Mark III is a much more substantial change. So for now I am holding off. I also am curious to see what the inevitable EOS 1Ds Mark III will offer before I make a purchase decision.
NOTE: The above was written prior to a scathing review of the new Autofocus System by Rob Galbraith - I am glad I heeded my own warnings as there are many varying reports of problems with the way the Autofocus system tracks targets. Rob Galbraith has done the most definitive tests that I have seen: www.robgalbraith.com/bins/content_page.asp?cid=7-8740-9006
New Stuff I Did Buy
There are a couple of new products that I did purchase from Canon recently but these are products that went through a relatively simple upgrade and I wasn’t worried about initial problems.
EF 70-200 f/4L IS – I replaced my beloved non IS 70-200 f/4L lens with the new IS version after it had been out about 6 months. I am very glad I did. While the non-IS was a fine lens rivaling the best zooms in the world, the new 70-200 f/4L IS is the sharpest zoom ever produced by Canon and I dare say by any manufacturer. There is simply nothing that comes close. Not even the highly acclaimed 70-200 f/2.8L (IS and non-IS). I wish all Canon lenses were this good.
EF 16-35 f/2.8L II – I did upgrade to the new version of the 16-35 simply to get brighter corners. My old lens was a relatively good performer even on the wide end but with full frame sensors, it lost a lot of light (not as bad as the 24-105 wide open tough). The new 16-35 incorporates a wider barrel and larger front as well as an optical design that allows light to hit the sensor corners more squarely. This results in about 1 stop brighter corners than the old lens. Canon also claims the lens is sharper in the corners but in my experience this is not the case – it’s about the same. The downside of this lens is that it does seem to have slightly more barrel distortion than its predecessor but chromatic aberrations are somewhat reduced. Overall, it’s a toss-up on whether this is a good upgrade or not. If dark corners bother you, then yes it is. If curved horizons bother you, then it’s not a good upgrade. If both bother you, like they do me, then it’s a toss-up.
Building the Ultimate Photo Editing Machine
At the end of April, I teamed up with computer builder Falcon Northwest (www.falcon-nw.com) to build a phenomenal performing photo editing platform. For those not familiar, FalconNW builds some of the very best PC’s in the world. They use premium components, tested beyond the component manufacturer’s specifications and they work with each client individually to build a machine customized for them. If it is possible to do, they can make it happen. They do not outsource technical support and when you call them, you immediately get a human being that really knows what they are doing.
We ended up building an Intel Core 2 Quad system based on the 2.66GHz Kentsfield Microprocessor. While a 2.93GHz processor is now available, I felt that the minor performance gain was not worth the major increase in system price and the increase in power consumption. The Kentsfield Core 2 Quad (QX6700) processor incorporates 4 2.66GHz Core Micro architecture processors working in parallel for maximum performance on any application that is threaded. A threaded application is a program that can execute multiple computation strings simultaneously if given multiple processors. Photoshop is such an application and major performance gains can be had running it on a multiprocessor platform.
For the Motherboard, we used Intel’s Extreme Edition B975BX2 board. There are a number of choices here, some more customizable than Intel’s board but for maximum compatibility with excellent performance, this board was the way to go as it will absolutely run anything and everything ever written for the PC platform.
For memory, we used Corsair’s ultra high performance DDR2 memory and installed 4GB of it. Just one look at a Corsair DIMM and you will realize this isn’t your run of the mill memory module. They are tested to much tighter standards than the memory manufacturer and are capable of being over clocked substantially if you choose to go that route.
For program and operating system storage, I selected a Western Digital 150GB 10,0000RPM Raptor drive. This is one of the fastest seek time drives there is and is the current choice for a high performance system drive. For data storage, the Falcon guys and I debated the direction to go. They were trying to steer me clear of RAID 5 due to the length of time it can take to rebuild the array but the only way I could get 1TB of storage with redundancy into the chassis was to go this route as the new Hitachi 1TB drives were not yet available to do a RAID 1 set-up with and I wasn’t comfortable with the lack of redundancy of a RAID 0 set-up even though on paper that would give slightly better performance – whether or not it does in the real world is debatable anyway. So ultimately, I went with three Seagate SATA II 500GB drives in a RAID 5 configuration.
When it came to choosing a graphics card, I debated long and hard before finally setting on a new generation DirectX 10 nVidia 8800 card. This is top of the line and nothing I would likely ever do would even make this card break a sweat as photo work does not at all tax a graphics card. My reasoning however was that as the next couple of years played out, there would be more and more programming that required DX10. Even some of the higher end versions of Microsoft’s Vista operating system requires DX10 for certain features. So when push came to shove, I overspeced the system with the nVidia 8800 card. I only got the 320MB memory version of the card because nothing I can envisioning doing with this card would ever need even half that much.
Since this is a next generation machine, I gulped and opted for Vista Ultimate. More on that in a minute!
To top off the system I added an integrated floppy/12in one card reader, DVD-RW drive, CD-RW drive, and a wireless network card. We used a 750 Watt Silverstone Strider Power Supply, Zalman CPU Cooler, and put it into FalconNW’s highly acclaimed aluminum ICON case.
The system arrived about 3 weeks later with tons of documentation, Falcon’s own test data on my system and a human sign off on the installation, operation, and performance of every component in the system. A schematic for my specific system was included as were all of the accessory items that shipped with each of the components but weren’t necessary for my build. It also came with a T-shirt, coffee mug, and a special FalconNW coffee blend.
The next step in this adventure was to set-up the machine. First I installed 5 more USB2 ports on top of the 8 that the system came with, connected my Apple 30” monitor, keyboard, Logitech Laser Mouse and then I fired it all up. Everything worked perfectly out of the box and it automatically installed limited drivers for the wireless keyboard and mouse so now it was time to start installing software and drivers. The first thing I noticed is that virtually every mouse click grayed out the screen and popped up a box wanting to verify that this is actually what I wanted to do. I immediately figured out how to turn this off by disabling a module called User Account Control (UAC) – this is also the module that renders most monitor profiles useless so this was a good change. In a single user, administrator account environment, this does not pose any significant security risks.
The first problem I ran into was that my anti-virus program of choice (Prevx) did not run at all –actually it wouldn’t even install properly. I checked the Prevx site and found a Beta for Prevx2 that was supposed to work with Vista but it did not work either. So I downloaded a trial version of Trend Micro’s Vista anti-virus program to at least give me protection for the time being – the trial lasts for 30 days. At this point I downloaded the latest Vista drivers for my mouse and keyboard and got them back to being able to use all of their special functions.
I had no real problem installing all of my normal software including specialty programs like Photomatix and the new multiprocessor version of PanoramaFactory. Photoshop CS3’s installation went so much smoother on this clean install than it did on my old XP system. Then it came time to turn this machine into a color managed machine. As I had been warned, my Xrite DTP94 colorimeter was not recognized by the system and Xrite has no drivers available for Vista. The driver disk that came with the Xrite also did not have a driver that would install under Vista. So I went on a Google fishing expedition to see if anyone had solved this problem and sure enough somebody more clever than me found a workaround. It is now listed on several sites and the language is a bit hard to follow as its been translated from another language but this is the best explanation of how to do it I’ve found:
http://forums.dpreview.com/forums/read.asp?forum=1004&message=21971571
Once I had everything installed and everything tweaked the way I wanted, I ran some Photoshop comparisons between old and new systems. Here are a few comparisons:
|
Test |
Pentium 4 HT, 3.2GHz, 4GB DDR2-533, XP Home, PS CS3 |
Core 2 Quad, 2.66GHz, 4GB DDR2-800, Vista Ultimate, PS CS3 |
|
Photoshop Load |
43 seconds |
2.9 seconds |
|
EOS 1Ds2 RAW Conversion – ACR 4.0 |
9.3 seconds |
1.3 seconds |
|
Full Frame 16.7 megapixel Lens Blur Filter with 10 history states |
4 minutes, 21 seconds |
47 seconds |
|
NIK Color EFEX Pro Sunshine Filter – 16.7 Megapixel |
24 seconds |
6.4 seconds |
|
ACR Color Calibration Script – 16.7 Megapixel |
1 hour, 43 minutes |
17 minutes |
As you can see, the productivity increase in Photoshop is absolutely enormous!
Photoshop Tip
This issue's Photoshop Tip is an old one but many people still ask about it.
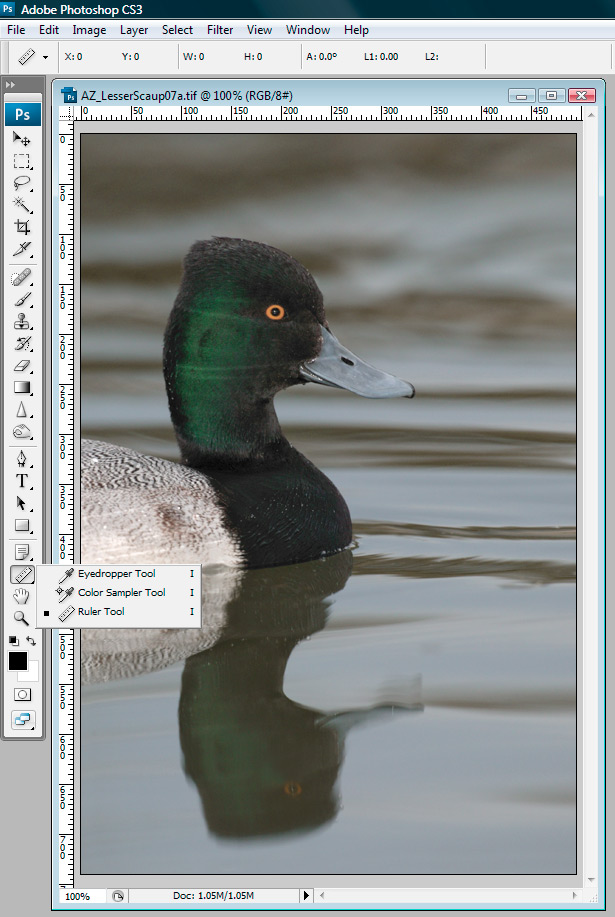
Q. What is the fastest way to level an image?
While there are many ways to level an image, for me the fastest way is to use the ruler tool:
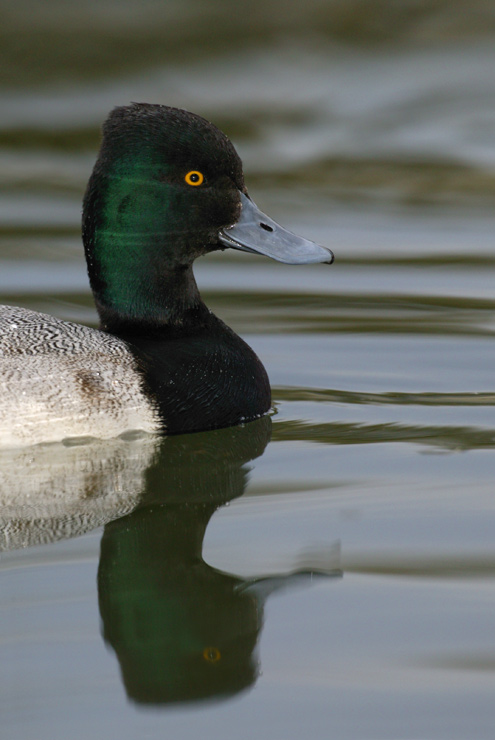
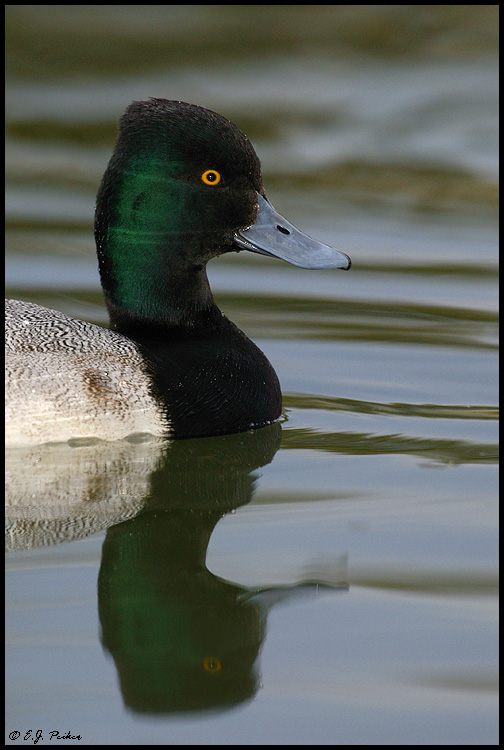
The original image is tilted slightly in the counter-clockwise direction. Note that the eye of the primary image is somewhat to the left of the eye in the reflection:
First we select the ruler tool:
Next we draw a line that we want to use to level the image – in this case we will line up the reflection of the eye with the primary image. Note that in a landscape photo, you can do the same thing by drawing a line across the horizon which will then be leveled in the subsequent steps:
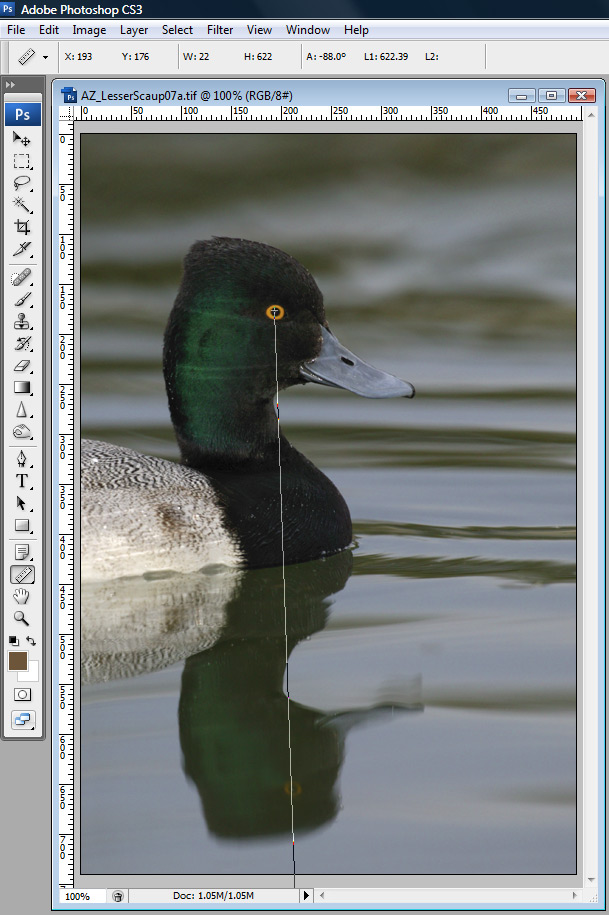
The leveling process from this point is incredibly easy as we let Photoshop do the work for us.
Simply select Image > Rotate > Arbitrary – you will see that Photoshop has already done the rotation calculation for you and you simply click on OK:
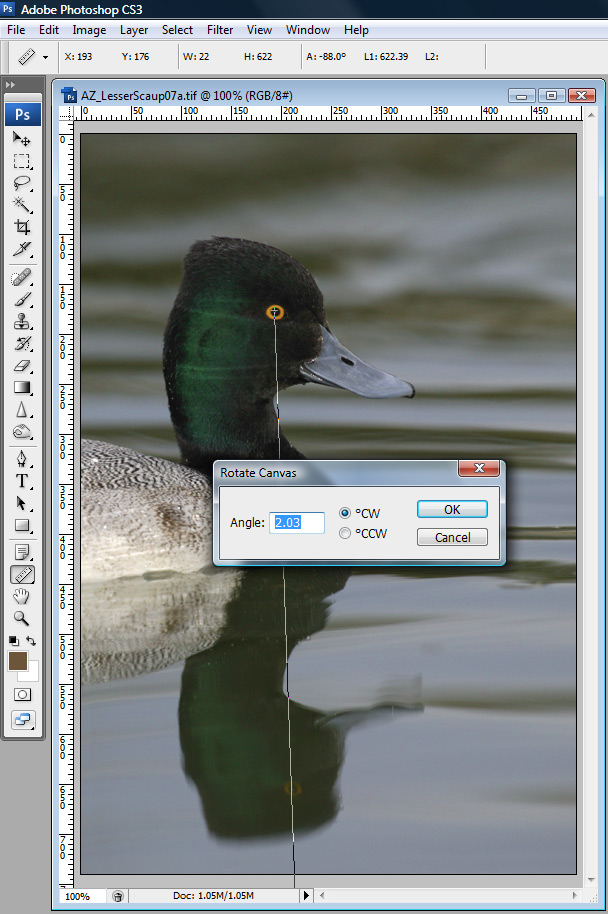
You will now need to crop off the background space created due to the rotation and your final product is complete:
DuckShop 2008 Slots Still Available
If you ever thought you would want to attend a photo workshop but have trouble with the full week or more commitments, my DuckShops are perfect for you. They are either 2 or 3 day weekend events in generally sunny and temperate climates such as Southern California, Arizona, or New Mexico. You get some serious bird photography instruction, learn about the species themselves and have some close encounters of the swimming feathery kind.
I still have a few slots available for this winter but hurry; these generally are gone by the end of summer.
Click here for more info: www.ejphoto.com/Duckshops.htm
NOTE: South American Patagonia Trip Diary with many photos can be found here: http://www.ejphoto.com/patagonia_diary_page.htm
Legal Notice: Written and Photographic content © 2007 - E.J. Peiker, Nature Photographer. The text and photographs contained herein may not be copied or reproduced without written consent. This newsletter may be forwarded without restriction unaltered and in its entirety only.